MQ9 Gas Sensor
Keep your work safe with MQ sensors
Introduction
Section titled “Introduction”MQ Gas Sensor Series
Section titled “MQ Gas Sensor Series”MQ gas sensor series include different models for detecting different kind of gases. Take a look at the following table and choose wisely the right MQ sensor for your project.
| Name | Detectable gas |
|---|---|
| MQ2 | Methane, Butane, LPG, smoke |
| MQ3 | Alcohol, Ethanol, smoke |
| MQ4 | Methane, CNG Gas |
| MQ5 | Natural gas, LPG |
| MQ6 | LPG, butane gas |
| MQ7 | Carbon Monoxide |
| MQ8 | Hydrogen Gas |
| MQ9 | Carbon Monoxide, flammable gasses |
| MQ131 | Ozone |
| MQ135 | Air Quality (CO, Ammonia, Benzene, Alcohol, smoke) |
| MQ136 | Hydrogen Sulfide gas |
| MQ137 | Ammonia |
| MQ138 | Benzene, Toluene, Alcohol, Acetone, Propane, Formaldehyde gas, Hydrogen |
| MQ214 | Methane, Natural gas |
The MQ9 sensor can detect carbon monoxide density from 10ppm to 1000ppm and flammable gases density from 100ppm to 10000ppm.
Note that ppm stands for part per million.
MQ9 has an internal heater which starts warming up if a 5V voltage is applied.
The internal resistance of this sensor changes as the density of the detectable gases changes.
MQ9 sensor needs 24 to 48 hours of preheating time.
Connect the power supply and leave for the required time until it gets ready.
You also need to calibrate the sensor.
Hardware requirements & setup
Section titled “Hardware requirements & setup”- Arduino Uno board or any Arduino-like board
MQ9 Gas Sensorsensor- Hook-up wires of different colors
- Breadboard
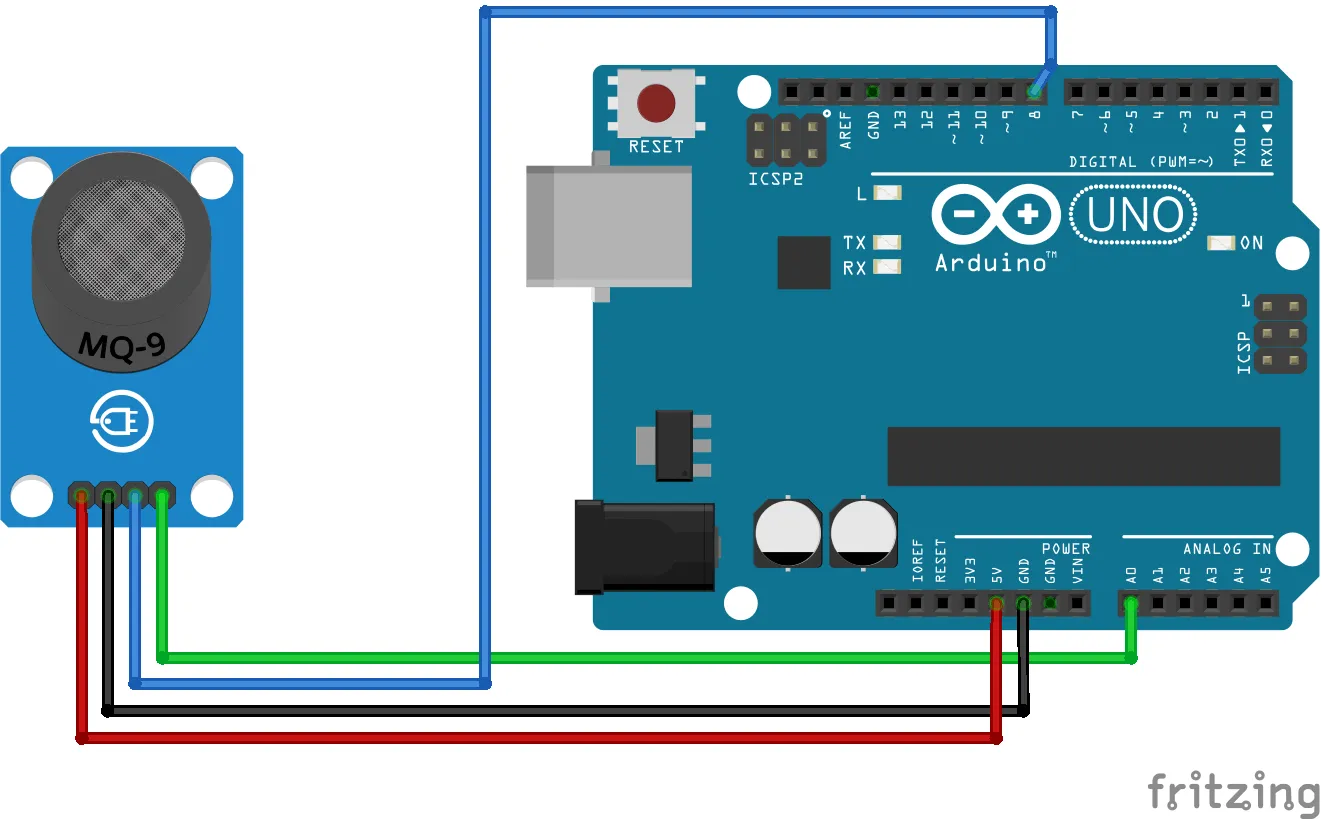
MQ sensor has 5 pins:
VCC(connect to5V)GNDDOpin returnsHIGHif the concentration of gas is higher than a certain value*AOpin returns an analog value based on the concentration of the gas
* This value can be set by the potentiometer on the board
Before moving on, let’s clarify some important notes:
- Do not expose this sensor to water and frost
- Applying a voltage higher than
5V(or to the wrong pins) may damage the sensor - Exposing the sensor to a high concentration of gases for a long time may have a negative effect on its performance
- Shaking or vibrating the sensor may decrease its accuracy
Calibrate MQ9
Section titled “Calibrate MQ9”Before using the module you have to calibrate it.
This sensor measures the gas concentration based on resistance ratio, which includes R0 and Rs.
R0 is sensor resistance in 1000ppm concentration of LPG (Liquefied Petroleum Gas).
While Rs is internal resistance of the sensor which changes by gas concentration.
In clean air, after preheating, upload the following code and wait for about 15 minutes until R0 reaches a fixed value.
/*  MQ9 Calibration  modified on 19 Feb 2019  by Saeed Hosseini  https://electropeak.com/learn/*/void setup() {  Serial.begin(9600);}
void loop() {  // 'RS_air' is Rs in clean air  // 'R0' is R0 in 1000 ppm LPG  float sensor_volt, RS_air, R0, sensorValue;
  // Average  for (int x = 0 ; x < 100 ; x++) {    sensorValue = sensorValue + analogRead(A0);  }  sensorValue = sensorValue / 100.0;
  //-----------------------------------------------/  sensor_volt = (sensorValue / 1024) * 5.0;  RS_air = (5.0 - sensor_volt) / sensor_volt; // Depend on RL on your module  R0 = RS_air / 9.9; // According to MQ9 datasheet table  Serial.print("sensor_volt = ");  Serial.print(sensor_volt);  Serial.println("V");  Serial.print("R0 = ");  Serial.println(R0);  delay(1000);}
As you see in the code above, you have averaged from 100 data to achieve a stable value.
Then you measure the sensor voltage and according to RL resistance (in our case, 5K), you calculate Rs.
According to the table available in the datasheet, R0 can be found.
Simple Gas Detector
Section titled “Simple Gas Detector”In the following code, you need to replace R0 with the value you get from the previous step.
const short int LED = LED_BUILTIN, DO_pin = 8, A0_pin = A0;
void setup() {  Serial.begin(9600);  pinMode(LED, OUTPUT);  pinMode(DO_pin, INPUT);}
void loop() {  int alarm = 0;  float sensor_volt;  float RS_gas;  float ratio;  // replace this value with the one you get from calibration  float R0 = -0.10;
  int sensorValue = analogRead(A0_pin);  sensor_volt = ((float)sensorValue / 1024) * 5.0;  RS_gas = (5.0 - sensor_volt) / sensor_volt; // Depend on RL on yor module  ratio = RS_gas / R0; // ratio = RS/R0
  Serial.print("sensor_volt = ");  Serial.println(sensor_volt);  Serial.print("RS_ratio = ");  Serial.println(RS_gas);  Serial.print("Rs/R0 = ");  Serial.println(ratio);  Serial.print("\n\n");
  alarm = digitalRead(DO_pin);  digitalWrite(LED, alarm);
  delay(1000);}
Conclusion
Section titled “Conclusion”Gas sensors can be very useful especially if used in combination with smart ways of communication like nRF24L01+ wireless module.
You must always remind that a project is always made up by different smaller projects. Every time you learn how to use a sensor, you also learn new ways to combine different sensors and use them together to solve more and more complicated problems.
Documentation
Section titled “Documentation”Useful links: