Arduino Nano RP2040 Connect
Introduction
Section titled “Introduction”Nano RP2040 Connect ROM Bootloader mode
Section titled “Nano RP2040 Connect ROM Bootloader mode”Since Arduino Nano RP2040 Connect upload procedure relies on the Raspberry’s bootloader, it could be seen as a mass storage device from your computer. If your machine is fast enough during a sketch upload, it can notify you about a USB device being plugged.
When a sketch is uploaded successfully, the mass storage of the board may be visible to the OS.
When this occurs, you can force the ROM bootloader mode, which will enable mass storage, allowing you to upload UF2 images like CircuitPython, MicroPython, a regular Arduino sketch or an Edge Impulse firmware.
If the board is not detected even when is connected to your computer. You can solve through the following steps:
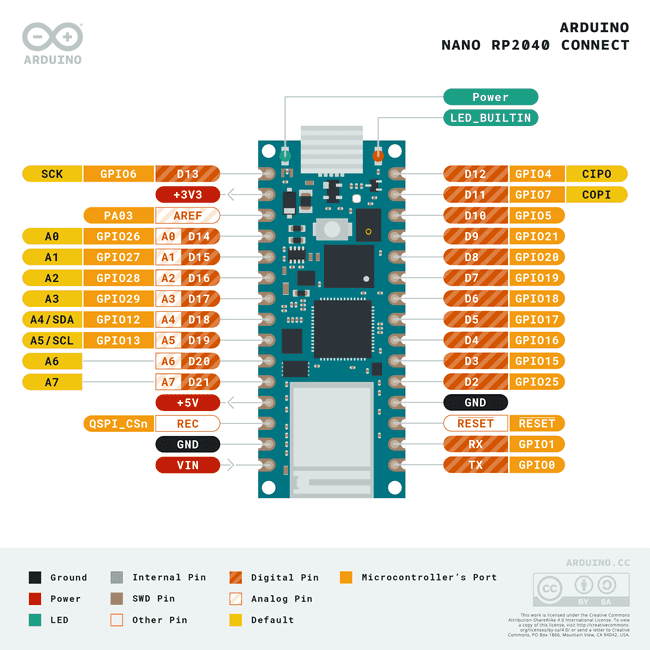
- Connect jumper wire between
GNDandRECpins - Press Reset button
- Unplug and plug back the UBS cable
- Upload the Arduino sketch
A factory-reset can be performed by dragging the blink.ino.elf.uf2 file into the mass storage (wait for the mass storage to automatically unmount).
Post Install script
Section titled “Post Install script”If you can’t manage to get the Arduino Nano RP2040 Connect working, try to run this command:
sudo ~/.arduino15/packages/arduino/hardware/mbed_nano/4.0.2/post-install.shBy the time you’ll read this article, the version 4.0.2 could have changed.
If the version becomes X.Y.Z, you would need to run the command:
sudo ~/.arduino15/packages/arduino/hardware/mbed_nano/X.Y.Z/post-install.shTutorials
Section titled “Tutorials”Add the tutorials from ML, show interconnection. They’re under RaspberryPi because of the core.
MicroPython
Section titled “MicroPython”MicroPython is a lean and efficient implementation of the Python 3 programming language that is optimized to run on microcontrollers and in constrained environments.
Install MicroPython
Section titled “Install MicroPython”Took inspiration from Installing MicroPython official guide.
git clone https://github.com/arduino/lab-micropython-installer.gitcd lab-micropython-installergit checkout v1.4.0 # ensure to install a stable versionnpm installnpm run startThen connect the board and follow the instruction on the installer window.
MicroPython IDE
Section titled “MicroPython IDE”You can write your own code using the new MicroPython IDE developed my Arduino team.
git clone https://github.com/arduino/lab-micropython-editorcd lab-micropython-editornpm installnpm run devThen click on upper-left button .
MicroPython Code
Section titled “MicroPython Code”Take a look at the following directory:
CircuitPython
Section titled “CircuitPython”CircuitPython is a derivative of MicroPython designed to simplify experimentation and education on low-cost microcontrollers.
Simply copy and edit files on the CIRCUITPY drive to iterate.
Install CircuitPython
Section titled “Install CircuitPython”Click the link below and download the latest UF2 file.
To enter the bootloader, double-tap the reset button.
After that, the RPI-RP2 drive will appear as a new disk drive.
If the drive does not appear, release the reset button, and then repeat the process above (double-tap the reset button).
Drag the previously downloaded .uf2 file to RPI-RP2 drive.
The RPI-RP2 drive will disappear and a new disk drive called CIRCUITPY will appear.
Let’s it, the board is read yto be programmed.
CircuitPython IDE
Section titled “CircuitPython IDE”I suggest you to use Mu Editor.
Run the IDE with the board attached. It should auto-detect Adafruit CircuitPython mode. Otherwise, select it my yourself by pressing button on the upper left of the window.
CircuitPython Code
Section titled “CircuitPython Code”Take a look at the following directory:
Conclusion
Section titled “Conclusion”Documentation
Section titled “Documentation”Here is the full list of links I am using to write this article:
- Datasheets:
- Stores
- Docs:
- Libraries:
- arduino-nano-rp2040-connect directory from arduino-projects GitLab repository