Store data in ViewModel
Introduction
Section titled “Introduction”Jetpack is a suite of libraries to help developers follow best practices, reduce boilerplate code, and write consistent code. Architecture Components are part of Jetpack libraries, to help you design apps with good architecture. In today’s blog I’ll talk about the ViewModel, which is part of the Architecture Components and allows you to store your application data.
In this blog post, I’ll analyze the code of Unscramble app I made following Android Basics Kotlin course.
ViewModel Main Concepts
Section titled “ViewModel Main Concepts”This slice is about technical (and at some point maybe philosophical) arguments that concerns the ViewModel.
Architectural Principles
Section titled “Architectural Principles”The most common architectural principles are:
- separation of concerns the app should be divided into classes, each with separate responsibilities
- driving UI from a model
Models are responsible for handling the data for an app.
They’re independent from the Views and components, so they’re unaffected by the app’s lifecycle and the related issues.
The main classes (or components) are:
- UI Controller (activity/fragment),
ViewModel,LiveDataRoom
UI controller
Section titled “UI controller”Activities and fragments are UI controllers: they control the UI.
Data in the app or any decision-making logic about that data should not be in the UI controller classes: it should be added in the app’s ViewModels.
ViewModel
Section titled “ViewModel”The ViewModel is a model of the app data that is displayed in the views.
It stores the app related data that isn’t destroyed when activity or fragment is destroyed and recreated by the Android framework.
ViewModel objects are automatically retained during configuration changes so that data they hold is immediately available to the next activity or fragment instance.
Backing Fields & Properties
Section titled “Backing Fields & Properties”A field is used as part of a property.
It holds its value.
Fields cannot be directly declared.
When a property needs a backing field, Kotlin provides it automatically.
This backing field can be referenced using the field keyword.
// the initializer assigns the backing field directlyvar myCount = 0 set(value) { if (value >= 0) field = value // ERROR StackOverflow: Using actual name 'myCount' would make setter recursive // myCount = value }Moreover, if you need to perform some kind of actions that doesn’t fit the implicit backing field scheme of getter and setters, you can always implement a backing property, which allows you to return something from a getter other than the exact object.
private var _table: Map<String, Int>? = nullpublic val table: Map<String, Int> get() { if (_table == null) { _table = HashMap() // type parameters are inferred } return _table ?: throw AssertionError("Set to null by another thread") }You’ll use backing property to override the getter method to return a read-only version of your data.
The convention is to prefix the private property with an underscore.
Inside the ViewModel class, the property _score is private and mutable.
It is only accessible and editable within the ViewModel class.
Outside the ViewModel class, score is public and accessible from other classes like UI controllers.
Only the get() method is being overridden, this property is immutable and read-only.
When an outside class accesses this property, it returns the value of _score and its value can’t be modified.
This protects the app data inside the ViewModel from unwanted and unsafe changes by external classes, and allows at the same time external callers to safely access its value.
Kotlin provides the initializer block (init) for setup code needed during the initialization of an object instance. Initializer blocks run when the object instance is first created and initialized.
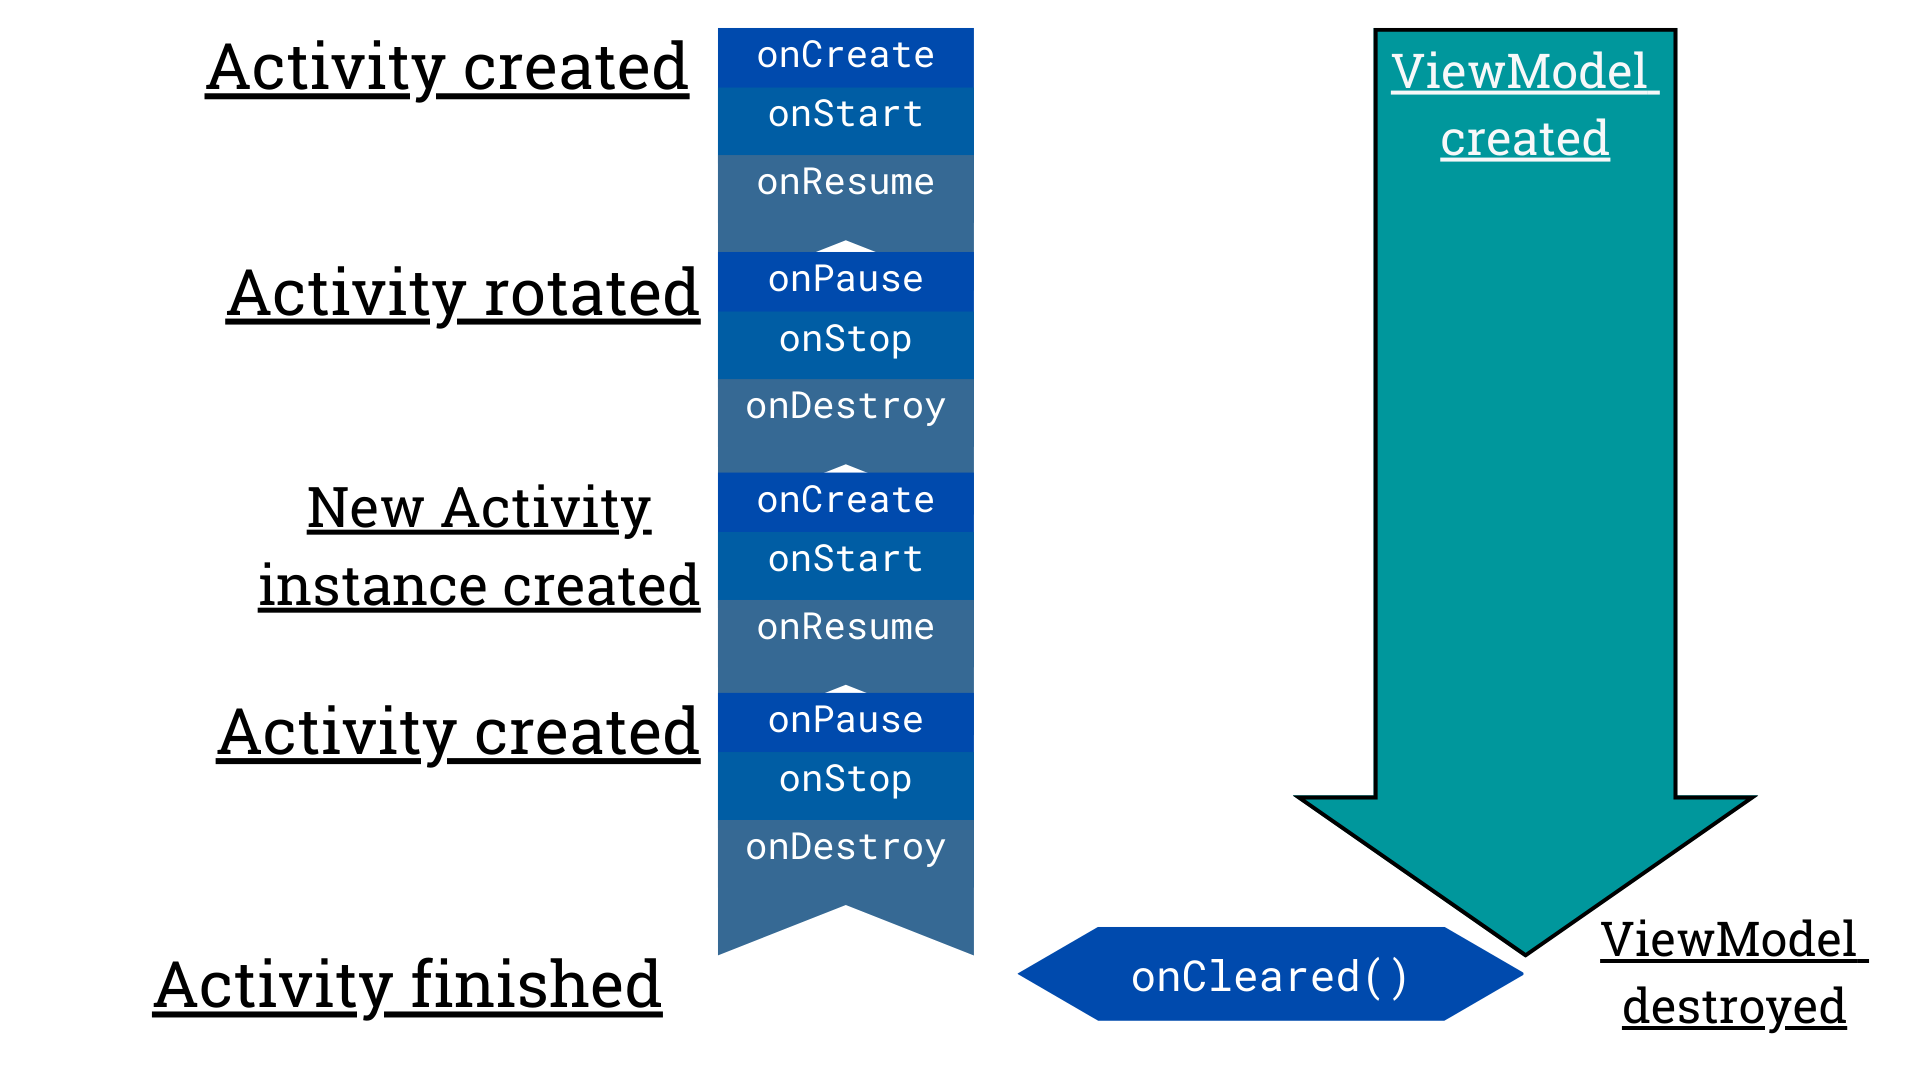
ViewModel Lifecycle
Section titled “ViewModel Lifecycle”The Android framework keeps the ViewModel alive as long as the scope of the activity (or fragment) is alive.
A ViewModel is not destroyed if its owner is destroyed.
The new instance of the owner reconnects to the existing ViewModel instance.
LiveData
Section titled “LiveData”LiveData is an observable data holder class that is lifecycle-aware.
Here are some characteristics:
- holds data: is a wrapper that can be used with any type of data.
- is observable: an observer is notified when the data held by the
LiveDataobject changes - is lifecycle-aware: the attached observer is associated with a LifecycleOwner. The
LiveDataonly updates observers that are in an active lifecycle state such asSTARTEDorRESUMED.
Data Binding
Section titled “Data Binding”Data Binding library allows you to bind UI components in your layouts to data sources in your app using a declarative format rather than programmatically.
Binding components in the layout file lets you remove many UI framework calls in your activities, making them simpler and easier to maintain.
The main advantage of using data binding is that it lets you remove many UI framework calls in your activities, making them simpler and easier to maintain.
This can also improve app’s performance and help prevent memory leaks and null pointer exceptions.
Gradle configuration
Section titled “Gradle configuration”First, edit the build.gradle (Module :app) file:
plugins {   id 'com.android.application'   id 'kotlin-android'   id 'kotlin-kapt' // enable data binding}
android {    buildFeatures {      dataBinding = true        // viewBinding true    }    // ...}
Above steps auto generates a binding class for every layout XML file in the app.
If the layout file name is activity_main.xml then your auto-generated class will be called ActivityMainBinding.
Convert layout file to data binding layout
Section titled “Convert layout file to data binding layout”To convert the layout to a Data Binding layout, wrap the root element in a <layout> tag.
You’ll also have to move the namespace definitions (the attributes that start with xmlns:) to the new root element.
Add <data></data> tags inside <layout> tag above the root element.
Android Studio allows you to do so by right-clicking the root element, select Show Context Actions > Convert to data binding layout.
Please Note: use the @{} syntax for a binding expression.
The layout will now looks like:
<?xml version="1.0" encoding="utf-8"?><layout xmlns:android="http://schemas.android.com/apk/res/android"    xmlns:app="http://schemas.android.com/apk/res-auto"    xmlns:tools="http://schemas.android.com/tools">
    <data>        <variable            name="counter"            type="int" />    </data>
    <TextView        android:id="@+id/sample"        android:text="@{counter}" /></layout>
In the related UI controller (activity or fragment), at the beginning of the onCreateView() method, change the instantiation of the binding variable to use data binding.
Given for example a GameFragment with the game_fragment.xml layout file (described above).
/** * Simplified GameFragment class */class GameFragment : Fragment() {    // Data Binding object instance with access to the views in the `game_fragment.xml` layout    private lateinit var binding: GameFragmentBinding
    override fun onCreateView(        inflater: LayoutInflater, container: ViewGroup?,        savedInstanceState: Bundle?    ): View {        // (old) View Binding layout inflation way        // binding = GameFragmentBinding.inflate(inflater, container, false)
        // inflate the layout XML file and return a binding object instance        binding = DataBindingUtil.inflate(inflater, R.layout.game_fragment, container, false)        return binding.root    }
    override fun onViewCreated(view: View, savedInstanceState: Bundle?) {        super.onViewCreated(view, savedInstanceState)
        // set the counter for data binding: allows the bound layout access it        binding.counter = 100
        // specify the fragment view as the lifecycle owner of the binding        // in this way the binding can observe LiveData updates        binding.lifecycleOwner = viewLifecycleOwner    }}
Binding Expression
Section titled “Binding Expression”By passing a ViewModel as variable of the layout, it can automatically observe for changes in a LiveData variable.
In this way you can avoid writing LiveData observers since binding expressions update the UI when the corresponding LiveData changes.
To avoid writing too many code snippets here, I suggest you to go through the Unscramble app code I made to see the different parts of the data binding implementation.
Don’t forget to look at string.xml resources!