Introduction
RC522 is a multi-communication RFID module for Arduino and microcontrollers like Adafruit boards.
It is known as MFRC-522 due to its NFX semiconductor microcontroller.
The module allows the developers to interface it with any other SPI, I2C and UART based microcontrollers.
It works on 13.56 MHz frequency, and it can act as a reader and write for UID/RFID cards.
The RFID cards communicate with the module at a short distance with radio frequency due to the mutual induction technique. In most of the security and commercial products, the module is effective because the errors and issues with RFID Tags are detectable by it.
Pinout
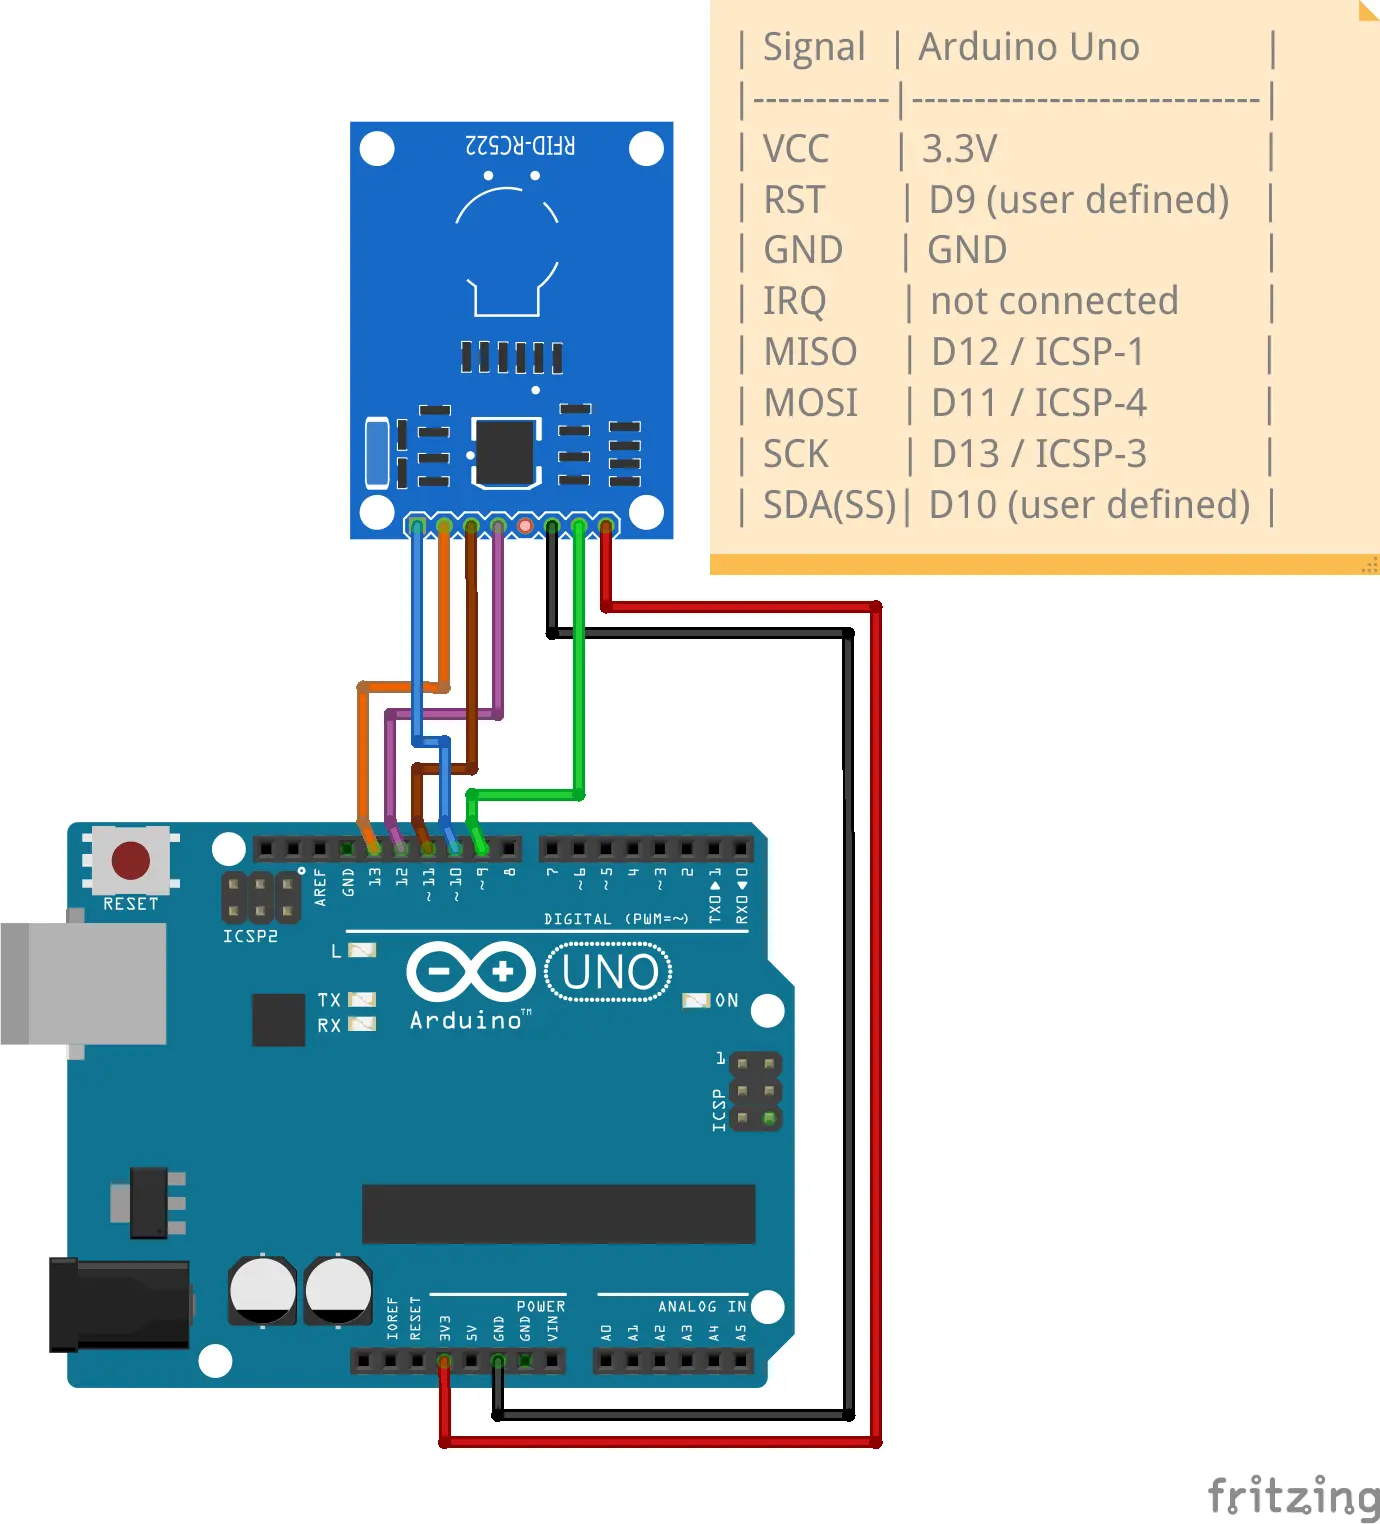
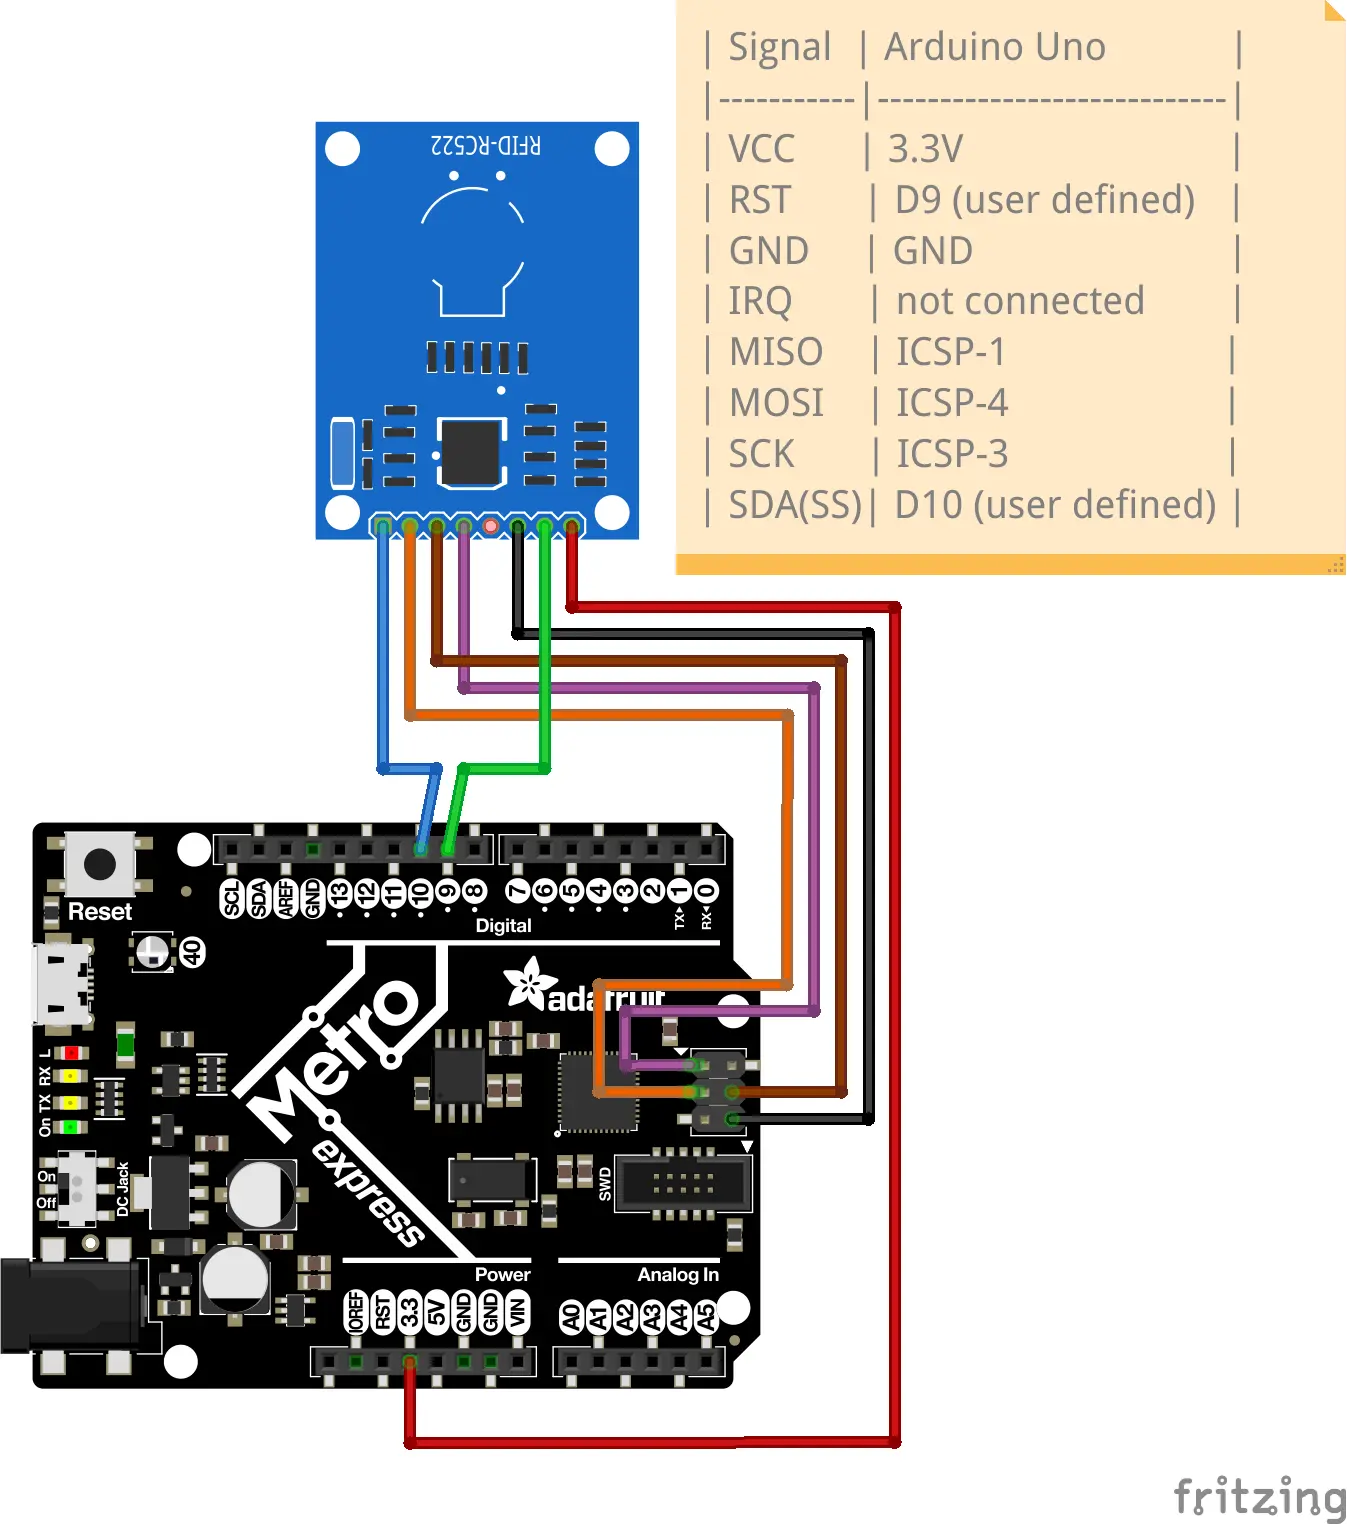
| Signal | Arduino Uno | Adafruit Metro M0 Express |
|---|---|---|
| VCC | 3.3V | 3.3V |
| RST | D9 | D9 |
| GND | GND | GND |
| IRQ | not connected | not connected |
| MISO | D12 / ICSP-1 | D22 / ICSP-1 |
| MOSI | D11 / ICSP-4 | D23 / ICSP-4 |
| SCK | D13 / ICSP-3 | D24 / ICSP-3 |
| SDA(SS) | D10 | D10 |
Please Note: D9 and D10 are user defined pins, meaning you can change them with the digital pins you prefer.
Be aware of modify the code accordingly.
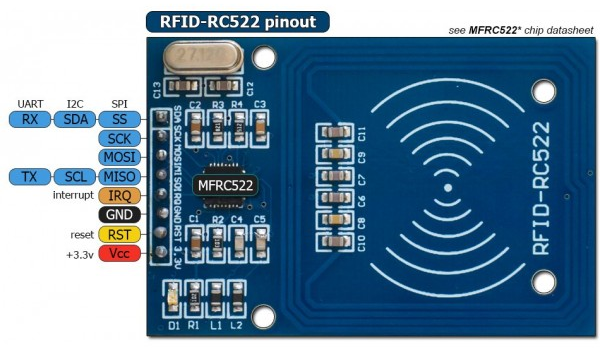
MISO is a data line for RFID-RC522 module to send data to the board with SPI communication protocol. It can also be used as SCL pin in I2C communication.
MOSI is a data line for RFID-RC522 module to receive data from the board with SPI communication protocol.
SCK is used in SPI communication to send clock pulse.
SS is a chip enable pin in SPI communication: it receives the signal when a master device (like Arduino or Adafruit board) wants to communicate. SS pin is also usable as an SDA pin in I2C communication. It also receives data during UART communication.
Wiring schemas
Below are shown some wiring schemas with most common boards.


Software Setup
Please refer to the official Getting Started guide to install the Arduino IDE on the OS you prefer.
You need to install MFRC522.h library in order to run the following sketches.
Click on Tools, Manage Libraries… and install the latest version.
As you can read from its README file, this library will not have further development because it’s used in many projects which often do not document what version they use. Committing changes might break those old projects and lead to bad experiences and support requests. For these reasons the library is in freeze mode.
Once installed the library and uploaded any of the sketches below, you’ll need to open the Serial Monitor with Ctrl + Shift + M shortcut or by clicking Tools menu, then Serial Monitor to look what happens when you bring the card near the sensor.
Base examples
Read NUID
This sketch shows how to the read data from a PICC (an RFID Tag or Card) using a MFRC522 based RFID Reader on the Arduino SPI interface. When you present a PICC at reading distance of the MFRC522 reader, the serial output will show the type and the NUID if a new card has been detected. Please Note: you may see “Timeout in communication” messages when removing the PICC from reading distance too early.
Let’s dive deep into read-NUID.ino code.
Instantiate an object of class MFRC522 in rfid variable.
MIFARE_Key is a struct used for passing a MIFARE Crypto1 (6 bytes) key, it is instantiated in key variable.
MFRC522 rfid(SS_PIN, RST_PIN);
MFRC522::MIFARE_Key key;
In setup() function, override the 6 bytes of key.keyByte with hexadecimal value 0xFF.
You can also initialize key.keyByte to 0xFF by instantiating key in this way:
MFRC522::MIFARE_Key key = {0xFF, 0xFF, 0xFF, 0xFF, 0xFF, 0xFF};Please Note: Note that 0xFFFFFFFFFFFF is the default PICC value at chip delivery from the factory.
In loop() function, before the effective body, are performed a couple of checks.
PICC_IsNewCardPresent() returns true if a PICC responds to PICC_CMD_REQA.
Only “new” cards in state IDLE are invited. Sleeping cards in state HALT are ignored.
// reset the loop if no new card present on the sensor/reader
// this saves the entire process when IDLE
if ( ! rfid.PICC_IsNewCardPresent()) return;
PICC_ReadCardSerial() a wrapper around PICC_Select.
It returns true if a UID could be read.
Remember to call PICC_IsNewCardPresent(), PICC_RequestA() or PICC_WakeupA() first.
// verify if the NUID has been readed
if ( ! rfid.PICC_ReadCardSerial()) return;
Note that PICC_CMD_REQA is part of PICC_Command enumerator inside MFRC522.h file.
It is a REQuest command of Type A.
It invites PICCs in state IDLE to go to READY and prepare for anti-collision or selection.
It is 7 bit frame.
If your PICC Tag (or Card) pass those checks, it means it has been read successfully.
You can now check if the PICC is of Classic MIFARE type:
if (piccType != MFRC522::PICC_TYPE_MIFARE_MINI &&
      piccType != MFRC522::PICC_TYPE_MIFARE_1K &&
      piccType != MFRC522::PICC_TYPE_MIFARE_4K) {
    Serial.println(F("Your tag is not of type MIFARE Classic."));
    return; // restart the loop()
}
If at least a byte of rfid.uid.uidByte is not equal to the corresponding byte of nuidPICC, it means that a new card has been detected.
if (rfid.uid.uidByte[0] != nuidPICC[0] ||
    rfid.uid.uidByte[1] != nuidPICC[1] ||
    rfid.uid.uidByte[2] != nuidPICC[2] ||
    rfid.uid.uidByte[3] != nuidPICC[3] ) {
  Serial.println(F("A new card has been detected."));
  // store NUID into nuidPICC array
  for (byte i = 0; i < 4; i++) nuidPICC[i] = rfid.uid.uidByte[i];
} else {
  Serial.println(F("Card read previously."));
}
In any case, print the hexadecimal (HEX), decimal (DEC) and string-converted value of the PICC Tag using printHex(), printDec() and printString() helper routines.
Before closing loop() function, call PICC_HaltA() to put the PICC in HALT state and PCD_StopCrypto1() to stop encryption on PCD.
rfid.PICC_HaltA();
rfid.PCD_StopCrypto1();
Write Personal Data
write-personal-data.ino sketch allow the user to write inside the PICC personal pieces of information.
The status of writing operation in stored in a status variable of type MFRC522::StatusCode.
StatusCode is an enumerator of bytes:
STATUS_OK: SuccessSTATUS_ERROR: Error in communicationSTATUS_COLLISION: Collision detectedSTATUS_TIMEOUT: Timeout in communicationSTATUS_NO_ROOM: A buffer is not big enoughSTATUS_INTERNAL_ERROR: Internal error in the code (should not happen)STATUS_INVALID: Invalid argument.STATUS_CRC_WRONG: The CRC_A does not matchSTATUS_MIFARE_NACK = 0xffA MIFARE PICC responded with NAK.
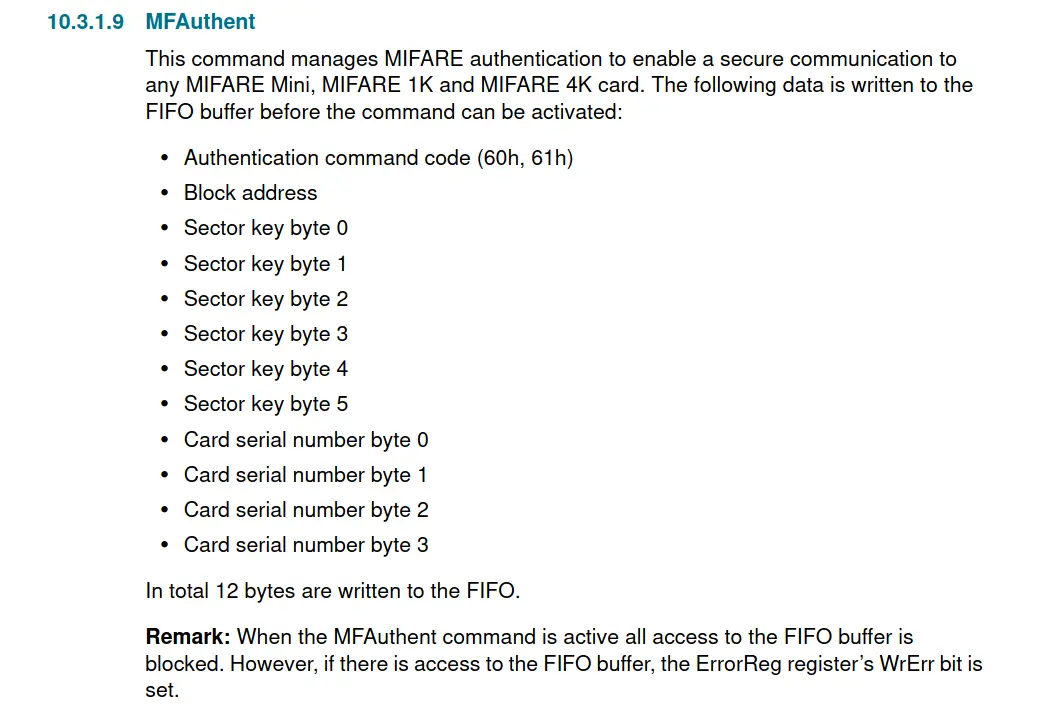
After getting the string data from the user, status is assigned to rfid.PCD_Authenticate(), which executes the MFRC522 MFAuthent command.
This command manages MIFARE authentication to enable a secure communication to any MIFARE Mini, MIFARE 1K and** MIFARE 4K** card.
The authentication is described in the MFRC522 datasheet section 10.3.1.9

As you can read from MFRC522.h line 320, PCD_Authenticate() returns a StatusCode enumerator and requires the following parameters:
byte command:PICC_CMD_MF_AUTH_KEY_AorPICC_CMD_MF_AUTH_KEY_Bbyte blockAddr: block number (0-0xff)MIFARE_Key *key: pointer to theCrypteo1key to use (6 bytes)Uid *uid: pointer toUidstruct (first 4 bytes of theUIDis used)
After checking the authentication, status is assigned to MIFARE_Write() function, which writes 16 bytes to the active PICC.
It requires the following parameters:
byte blockAddr: block number (0-0xff)byte *buffer:16bytes to write to the PICCbyte bufferSize: buffer size, must be at least16bytes (exactly16bytes are written)
Please Note: If you need to write a piece of information which is larger than 16 bytes, you must subdivide it into different chunks.
You must increment blockAddr for each chunk of information you write on the PICC.
Read Personal Data
read-personal-data.ino sketch allow the user to read from the PICC personal pieces of information.
In the same way of writing, status is assigned to rfid.PCD_Authenticate(), which executes the MFRC522 MFAuthent command.
Then, status is assigned to MIFARE_Read() function, which reads 18 bytes (16 bytes of data plus 2 bytes CRC_A) from the active PICC.
It requires the following parameters:
byte blockAddr: block number (0-0xff)byte *buffer:18bytes to read from the PICCbyte bufferSize: buffer size, must be at least18bytes
Note that CRC_A is a CRC algorithm.
Since you only care about the first 16 bytes, you need to loop through the buffer and write on the Serial Monitor one by one.
void read_one_block_data(byte block) {
  MFRC522::StatusCode status;
  byte len = 18;
  byte data_buffer[len];

  status = rfid.PCD_Authenticate(MFRC522::PICC_CMD_MF_AUTH_KEY_A, block, &key, &(rfid.uid));
  if (status != MFRC522::STATUS_OK) return;

  status = rfid.MIFARE_Read(block, data_buffer, &len);
  if (status != MFRC522::STATUS_OK) return;

  // print data_buffer on Serial Monitor
  for (int i = 0; i < 16; i++) {
    if (data_buffer[i] != 32) {
      Serial.write(data_buffer[i]);
    }
  }
}
Troubleshoot
When writing/reading data from/into the PICC, you could come across some common errors.
As mentioned in Write Personal Data, when calling PCD_Authenticate(), status is assigned to the authentication status.
Let’s take a closer look to the different errors that could happen during authentication.
STATUS_TIMEOUT
It means that a Timeout in communication occurred.
Lots of PICCs use default keys for sector 0, so that NUID can be accessed.
We can try different default keys by running rfid_default_keys.ino.
Conclusion
Documentation
Useful links:
- MFRC522 datasheet
- MFRC522 GitHub repository
- RFID-RC522 directory from
arduino-projectsGitLab repository - microcontrollerslab.com
- Serial library for Arduino
